Joe's Makerbot is now Joe's 3D Workbench. http://joes3dworkbench.blogspot.com/
This has been a long time coming. I avoided it for many technical reasons, but I now feel it's time.
Joe's Makerbot (this blog) will remain with it's history and posts, but I will no longer be updating it. From now on all posts related to making, designing, and teaching will be on Joes3dWorkbench.blogspot.com. I hope you'll all visit me there. I will also occasionally post my more editorial thoughts on 3DHacker.com's blog.
http://joes3dworkbench.blogspot.com/
Showing posts with label tutorial. Show all posts
Showing posts with label tutorial. Show all posts
Friday, December 6, 2013

Saturday, August 31, 2013
The best bad Blender tutorial I've ever seen
By all rights this is a lousy tutorial. It doesn't talk about the steps being done, it doesn't introduce the concepts being used, it runs through the material at a break-neck pace without consideration for the learner. And yet I have learned more by repeatedly going through this tutorial than I would have ever expected. Maybe it's because of the lack of similar tutorials, scarcity creating need where anything is better than nothing. Regardless of the reason I've referred back to this myself enough that I really feel I should share it here.
Of course if you'd like something that moves at a more tutorly pace I have a resource for that.
Thursday, August 22, 2013
Hairspray on Glass

Jumping to the end for you all, hair spray works alarmingly well (for ABS, PLA testing is still in the future, but it looks good). Here's the rules:
- Get the cheap stuff.
- Spray liberally on the glass.
- Allow the print the cool completely before removing the print and it will pop off in a most alarming way. You'll think it must have not been stuck during printing but believe me it did. If you remove while still hot you might have to reapply too soon because you're taking the hairspray off.
The prevailing theory is that hairspray on glass will stick the prints. So I gave it a try first thing when I switched to a glass build plate and the result was okay, but I found myself having to reapply a little more frequently than I wanted. So I switched to ABS slurry on the glass to see if it would last longer. It didn't. In fact removing the print removed the slurry down to the glass every time meaning if I didn't reapply after every print the next one didn't stick. However that led me to the thought that maybe I was removing the hairspray by not waiting for the plate to cool. So I did and I have yet to need to reapply hairspray after a day. That means my prints take longer because now they have a cool down period, but it's worth it. Besides, I got the extra build plate so I'll just start switching them out between prints. Easy.
Thursday, July 11, 2013
3D Printing Tidbit - Don't tightly spool PLA
Got some clear PLA a little while back. Spooled it in my usual way around a spool from Makerbot. Turns out the spool I used was too tight, or maybe I spooled it too tight, and it resulted in the spool cracking into smaller and smaller segments near the end. Lots of air prints resulting from this.
In the future I'm either going to use a wider spool or print spool holder that is bigger.
In the future I'm either going to use a wider spool or print spool holder that is bigger.
Tuesday, April 30, 2013
Replacing the Ceramic Tape on the Heater Block
It's time to fix the ceramic tape. No patch job this time.
There is embarrassingly little written up on how to do this properly. The best I could find was a PDF on how to assemble the Mk7. In the end I managed but I made a lot of mistakes along the way. And sometimes the point of a tutorial is so that you don't have to repeat my mistakes. But I'm not about to let all my hard mistakes go to waste. So let's start with the don't list:
You don't need to disassemble the whole thing. I thought I needed to get at the bolt that holds the heater block from above. You don't. I thought I needed to get at the nut that's between the block and thermal barrier. There is absolutely no reason to do that. Besides which doing so demands heating up the extruder head periodically so the cold plastic inside them releases the parts. I burned my hands several times.


There is embarrassingly little written up on how to do this properly. The best I could find was a PDF on how to assemble the Mk7. In the end I managed but I made a lot of mistakes along the way. And sometimes the point of a tutorial is so that you don't have to repeat my mistakes. But I'm not about to let all my hard mistakes go to waste. So let's start with the don't list:
 |
| If you see this, you've gone too far |
However, there is a problem. With a dual extruder there is no way to remove the heater block without disassembling it a little. I have no idea how it's done in assembly, but for dis assembly follow these steps:

- Put this off for as long as possible. Seriously, this sucks. If you don't absolutely have to do this don't do it.
- Heat up the extruder and remove the nozzle with a socket wrench.
- Turn off the Makerbot.
- Remove the Extruder assembly to improve access to the extruder heads.
- On the bottom of the heater block beneath the heater element there is a teeny, tiny screw. (See picture above) This screw is not only small it's short.
- Give this screw a 1/4 turn. Do not unscrew it all the way. If you unscrew it too far do not drop it. If you drop be pray someone around you has excellent eyes. (Thank you, Honey. Love you.)
- With a pair of needle nosed pliers remove the heater elements. (See picture below)
Move the thermostat wire in front of the heater block.Unscrew the thermostat wire and remove it.- If you have two extruders and you're doing them both be sure to twist-tie the thermostat to the heater element and keep track of left and right.
- With a box wrench around the heater block untwist and remove the heater block.
- With the block removed replace the ceramic tape. (see PDF, page 23)
- Reattach the nozzle.
- Reassemble the block.
- Reinsert the heater element.
- Retighten the teeny, tiny screw.
- Reattach the thermostat.

I am extremely glad to see that the latest makerbot extruder wraps the ceramic tape laterally. Hopefully 2X users will never have to go through this. I considered getting some heat resistant duct tape and using it instead of the Kapton, but decided against it because it would increase the thickness of the block. Since I had disassembled everything I accidentally put the heater elements in the wrong nozzle, but it was an easy fix. Then I had to re-level my print heads and build plat. So for now I should be back up and running for a while.
Saturday, March 30, 2013
Replaced the nozzle. Dual printing again.
As usual I was going to take a lot of picture and walk you step-by-step through the process i went through, but the Makerbot's support page pretty much covers it, except for the absolutely filthy state of my old nozzles. And when I lost one of the nozzles, just put it down somewhere and I lost track of it. I'll find it. The old nozzle got an acetone bath and something fell out of iot, probably the blockage, so I'll save it for the future.
But that's it, 15 minutes and it was done. 30 minutes after the leveling and adjusting and changing the Kapton tape. Easy peasy.
But that's it, 15 minutes and it was done. 30 minutes after the leveling and adjusting and changing the Kapton tape. Easy peasy.
Acetone Vapor for Smoothing ABS
Jumping to the end the final result: This is a great way to quickly give a glossy finish to your prints and it does hide the layers somewhat, but getting good results necessitates having good starting material.
There's a lot of talk about using an acetone vapor to smooth ABS prints so I thought I'd try it out. But instead of getting a presto steamer (tho I may try that one day) I decided to construct my own.


 This is the queen from the Steampunk Robot Chess set by Dutch Mogul, a set that I want to print soon to add to my collection. I figured this one had enough detail to tell me what I wanted to know. The one on the left (that I didn't finish cleaning the black out of the nozzle before printing) is printed at 0.35mm layers, the one on the right is 0.15mm. I wanted to see if you could smooth thick layers away. So I heated the acetone, loaded the ladies, and dipped them in the fog for a few minutes.


There's a lot of talk about using an acetone vapor to smooth ABS prints so I thought I'd try it out. But instead of getting a presto steamer (tho I may try that one day) I decided to construct my own.

- Candle warmer, $2.50 at a Thrift Shop, $5 new.
- Wide mouth canning jar
- Lid for regular mouth canning jar
- Wire coat hanger
- SteelStick bonding epoxy putty stuff, $10 at Wal-Mart.
- Willing subjects to be tested on
Canning jars we have just lying around and since acetone doesn't effect glass that's what I'd be using. I tested the candle warmer and with nothing on it it gets up to about 110C so I figured it would work for this. But I couldn't use hot glue or superglue because acetone does dissolve that, so I had to find something that would work. So it's time to play with a new material.

Epoxy brand SteelStick. Just cut off what you need, kneed it until it's a uniform color, mould it, and let it set. Only thing is this stuff stinks to high heaven. Be sure you're near an open door or window which you should be anyways because, you know, ABS, acetone, yeah. I also cut notches in the small jar ring to allow the acetone to flow under it freely when this is done. Then I stuck the lid to the ring metal side up and cut the coat hanger and stuck it to the sides of the ring with the epoxy.

Thanks helping hands. next time around I'm going to punch holes or ridges or something in the ring and lid first because the extra width to the ring caused me to crack the jar when I tried putting it in.

Oops. I guess that means I'll have to try again if I want to do this more after this. The top is left intentionally open because the acetone will condense and drip if there's anything above it. Also, I really didn't need to do 3 wires coming up since I had the ring, I just need a handle to pull it up by. Things to remember for version 2 if there ever is one.
Now, on to the victims.


0.15 on the left this time, sorry about the confusion. The layers in the 0.35mm queen are still apparent, tho it is smoother, but there are parts of the 0.15mm layered ones that smooth out so smooth that it looks molded, particularly at the bottom. However, on the hat where the layer differences are very dramatic they are still apparent even at the 0.15mm layer height. But over all the effect is good and much more glossy.
At this point I just started throwing in anything I had around to see what would happen and to figure out how long to leave them in.

Acetoned on the left, plain on the right. Notice the glossy vs matte look. The smudge is because I left that one in the vapor for way too long. I wanted to see if it got any better and if the dramatic layers on top ever smoothed out and I can now say there is no appreciable difference to leaving the pieces in the vapor for any more than 2 minutes. Any longer and they become too soft to handle. Again, only put the parts in the vapor for 2 minutes or less, there is no benefit to leaving them in any longer.

Dual colored parts work just fine. In fact this one came out looking really good.

Vaporing a lithophane is actually a bad idea, tho because the glossy finish pics up reflections in the light in front of the lithophane ruining the effect. Won't be doing that again.

The piece on the left was submerged in the vapor for 1 second. When that vapor is going it starts working quick, no messing around.

However, it doesn't effect the assemble-ability of a whole chess set (I had an extra black hero).
Not sure if I'm going to make this a habit. it's neat, but 0.15mm layers are already really smooth. All this does is make them... shinny. Which is okay if that's the look you're going for. I think I'm going to do it to the whole Steampunk Robot set when I print it, but then I'll probably put it away for a while. Unless I find a good reason to do it some more. But, hey, now I've got a bunch of junk to sell in my store. (I'm keeping the chess set.)
Tuesday, March 19, 2013
3D Printing Tidbit: Clean Dual Colors
Dual color printing has 2 problems:


- The filament drools out of the hot end that's not printing causing a mess on the color that is printing.
- The filament that drooled out will cause that color to dry print until it catches up with the plastic that fell out.
Higher end printers take care of this a couple of different ways including "wiping" the nozzle on a special place to catch extra material to prime it before it becomes active and retracting the inactive head. Makerbots and other home 3D printers don't have the hardware or software for those features yet. It might be possible, however, to overcome some of these problems with some clever modeling.

What led me to this discovery was an accident. I added a black column to the bottom of my Guy Fawkes hoping that it would print that part first. But the first time I tried it out I just came off printing chess sets and forgot to turn dual printing off. The result was two fold: wasted plastic and the best Guy Fawkes mask so far. Granted I had to clean off where the white air printed the beard and eyes, but that was minor. So I knew it was possible to get the effect I was looking for, I just had to figure out how.

In the end I put a block of black on either side of the mask to catch the drooling white and prime the black. This yields pretty good results.Tho the black on the beard side tends not to be quite primed enough to stick so it has to be cleaned on that side, but no biggie.
So clever modeling can allow the overcoming of the shortcomings in dual printing until the software catches up.
Friday, March 15, 2013
greater than 45 overhang is ba.... doh

Myth. Busted.
The success of this has to do with a lot of factors not the least of which being how much the overhang has to hold on to. So if this had been a 60 degree incline in all directions it likely would have had the desired effect, but either way I can't use this illustration for that project any more.
Tuesday, March 12, 2013
How to make Lithophanes
I have been having a blast figuring out lithophanes and working out how to best make them. I think I'm going to start offering custom lithophane services in the store, which technically means I shouldn't give away how I'm making them... but that's not the sort of guy I am.
First thing I discovered is the local dollar store sells nightlights that I can print a holder for that will illuminate the lithophanes really well.

If you would like to make your own just follow these steps:
- Download BMPtoIGES
- Choose a source image with good contrast.
- Scale the picture to about 800x600 (the more pixels the more points in the final mesh the harder to process)
- In BMPtoIGES load your picture
- Set your edgecolor to black (so the holder has something to hold on to)
- Enter the following settings:

- File->Save and Process, choose STL and save your file
- Import the STL in Blender or your favorite mesh editing program
- Scale the STL by 50% in the Z only (I suppose you could change the 75 to 150 and just scale in all directions by 50%)
- Slice and print (I like to lay mine down. That works pretty well in my experience)
The Z-scaling is because I don't think BMPtoIGES likes decimals in its boxes.
I'm really surprised at how easy the process is... once I figured everything out. There was a lot of experimentation to get here, but in the end I'm fairly satisfied with the results. So don't let my suffering be in vain and enjoy making your own Lithophanes.
Wednesday, March 6, 2013
Good Sketchup Links
Before I settled on Blender for all my modeling needs I experimented with many different programs including Sketchup. It was owned by Google when I started playing with it, now its owned by Trimble. Some people seem to like it, but it never really worked for me mostly because getting STLs out of it was more trouble than it was worth. But if you are inclined to use Sketchup and are willing to setup STL output the Makerbot group has put together a number of links to help you produce good, clean models ready for 3D printing.
One of the biggest problems with models for 3D printing is that your models need to manifold. "Manifold" easier to define in negatives. If a model has any holes in its geometry it won't be manifold. Additionally sketchup occasionally creates stray polygons that need to be cleaned up. Personally I use Netfabb's cloud service as an all-in-one fix 'em up, but apparently there is a plugin for Sketchup called SuSolid that does this itself.
Actually, now I wish that Blender had a plug in that fixed these problems automatically. Hey! Blender folks, get on that!
One of the biggest problems with models for 3D printing is that your models need to manifold. "Manifold" easier to define in negatives. If a model has any holes in its geometry it won't be manifold. Additionally sketchup occasionally creates stray polygons that need to be cleaned up. Personally I use Netfabb's cloud service as an all-in-one fix 'em up, but apparently there is a plugin for Sketchup called SuSolid that does this itself.
Actually, now I wish that Blender had a plug in that fixed these problems automatically. Hey! Blender folks, get on that!
Monday, February 18, 2013
Fixing the crack by poking holes
Problem: Printing large flat surfaces in ABS causes cracks in the final build.
Theory: Increasing the plastic around corners will strengthen adhesion.
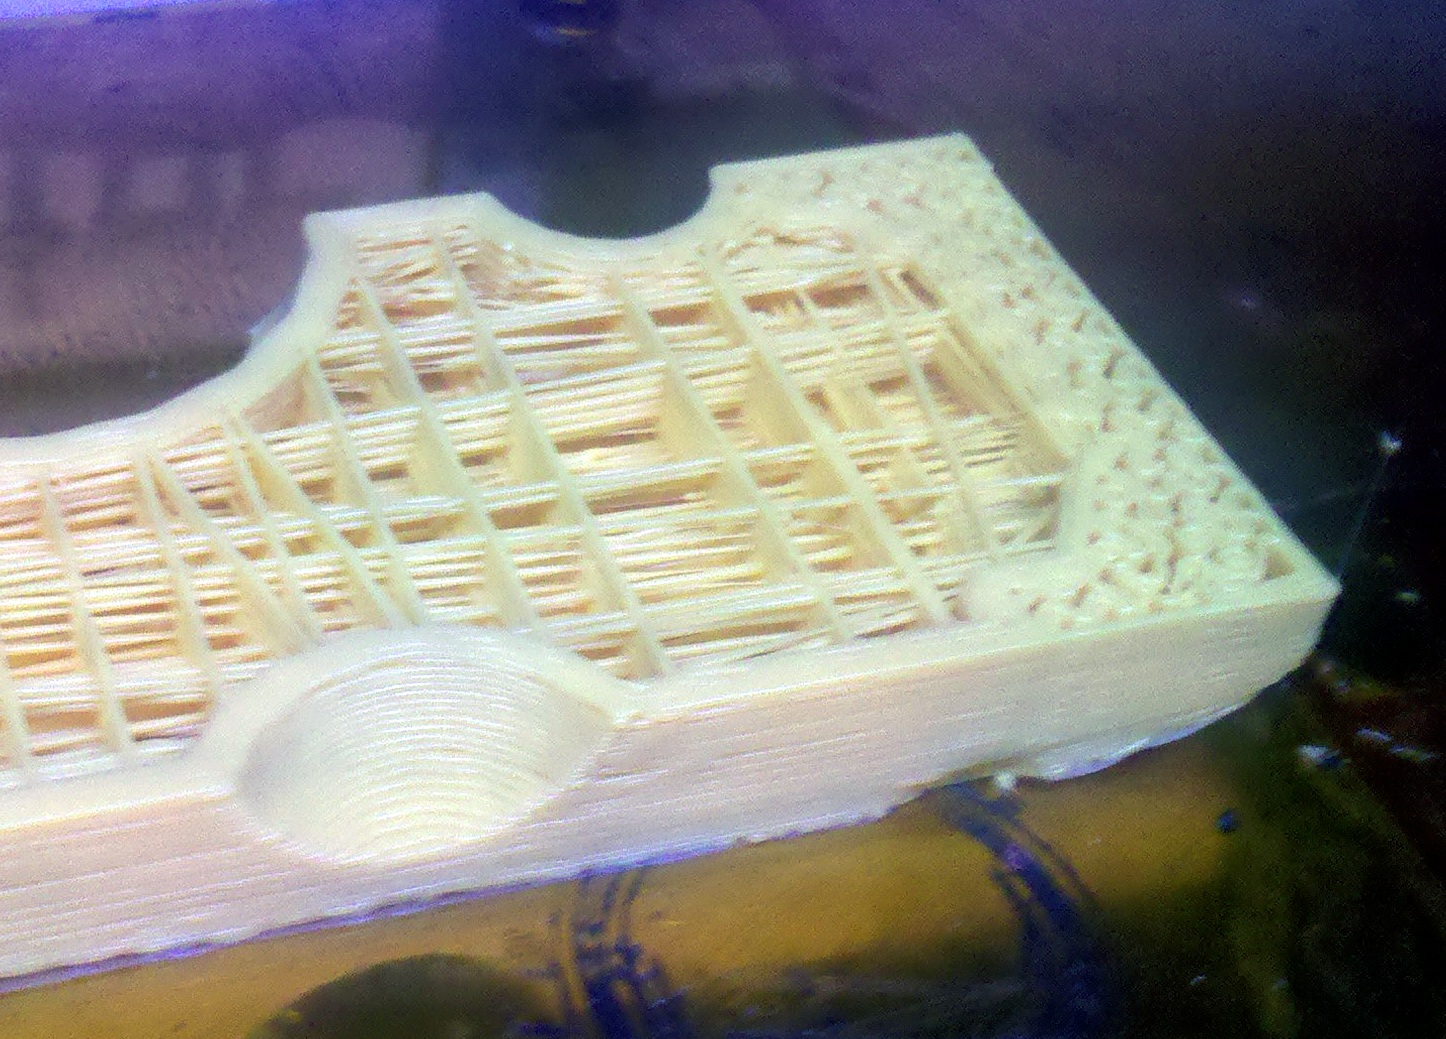
Method: Adding little holes in the print around the corners the result will use the shells to increase the plastic around the corners.
I've proven that more plastic does decrease cracks, but adding extra shells adds plastic everywhere. It would be nice if I could control the amount of plastic just be around the corners. If this works I may try writing a skienforge plugin for this purpose.
 I recently needed to make a door wedge. I thought the first one was too small so I scaled it up, by too much apparently. The scaled up print cracked badly so I decided this would be the perfect opportunity to try the holes. The holes are 0.1mm diameter 3 face cylendars arranged in a honeycomb pattern and brought to within .5mm of the various walls. The measurements were all approximate but next time I think I can do something much more exact.
 You can see as it prints the additional plastic. I don't think I put the hole close enough together which resulted in some air. But it seems to have been enough.
 Cracked in the background, fixed in the foreground. There was some curling on the new one, plus the new was slightly smaller than the extra large one that cracked because I didn't think I needed two extra large ones. They're both going to end up junked anyways. So the results are inconclusive but promising. It definitely got past what could and should have cracked. Obviously this wont work with small objects that don't have any extra internal surfaces to build up, but there's promise here.
Theory: Increasing the plastic around corners will strengthen adhesion.
Method: Adding little holes in the print around the corners the result will use the shells to increase the plastic around the corners.
I've proven that more plastic does decrease cracks, but adding extra shells adds plastic everywhere. It would be nice if I could control the amount of plastic just be around the corners. If this works I may try writing a skienforge plugin for this purpose.


Thursday, February 14, 2013
Fixing the Heated Build Platform Cable
When my heated build platform cable burned out my more DIY centric friends suggested I just cut the cable and solder directly to the connectors. Maybe one day, but for now I've got the new cable from makerbot support so I'm gonna go that route.
Filament by the foot is not enough for every job
Today's lesson is 100g of plastic, while enough to make one side of a pocket tactics game, is not enough to print a whole chess set, even if you scale it down 70%.
 That is the supposedly clear PLA. Not exactly clear, but it does have a good look. I'll probably get more and try again. In fact I've got a couple of projects that would be good in the clear PLA; like Raspberry Pi cases. I just wish I hadn't wasted this batch. I hear there's a way to predict how much filament you're going to use before you print. I should look into that.

Quick Repair to the Ceramic Insulation
I'm a little bit surprised there's not more about doing this online. It seems to me that the way the insulation is wrapped around the hot end that a lot more people would be having trouble with this. But maybe it's just me.
The goal this time was getting it back to working with the minimum effort possible. So instead of removing the hot end and having to work with components while they're hot I'm just going to make a patch job.
The goal this time was getting it back to working with the minimum effort possible. So instead of removing the hot end and having to work with components while they're hot I'm just going to make a patch job.
Wednesday, February 6, 2013
3D Scanning Pick 2 list
Seems to be a lot of talk lately about 3D scanning on various forums I'm on so I thought I'd collect and condense my thoughts in one place where I can drive traffic [winky emoticon]. It is the next logical step after 3D printing. My take on 3D scanning, with the footwork I've already done, is that you have 3 options and you can pick 2:
- Fast
- Accurate/High Resolution
- Cheap
Fast and Accurate: ScannerKiller offers an amazing package that can do a very high resolution full body 3D scan in an instant. It may even be possible to capture video at the speeds they're doing. They use a method called Stereo Photogrammetry and pre-calibrating their cameras. Despite the precalibration the setup still need lots of cameras (16 by my count) and projecting a randomized texture on the subject with a flash to add texture to smooth objects, some of which may be applied to a DIY option. But if you're going to buy one from them the asking price is $17000. There's also NextEngine, endorsed by Jay Leno. $3000. And really it's not that fast.
Fast and Cheap: ReconstructMe and a Microsoft Kinect and you're good to go. Sure the result looks like it's covered in mud, but it only took a second and only cost you about $100 for the Kinect.
Accurate and Cheap: There are lots of options in this category. 123DCatch or Agisoft StereoScan use photogrammetry but can be tricky. For 123DCatch like apps you need a lot of photos to make it work (more than ScannerKiller). Plus if your camera isn't super accurate or if the lighting changes it could mess up the whole process. 123DCatch is free and works by uploading your pictures to their server where they process it, Agisoft has a similar app for $179 but you download it and processes on your computer. You could also download a free copy of the David Scanner software with a decently high resolution webcam and either a laser line level or projector. David Scanner has a great tool chain to stitch multiple models together accurately. But with all these options the subject being scanned needs to hold very still through the scanning process which can take minutes to complete. Not good if you're trying to capture a child for posterity. There are some other DIY options as well but their tool chains are less complete.
Thursday, January 31, 2013
Print success by orientation
The story is I'm printing a replacement key that someone who had never done home 3D printing designed. Without thinking I just threw the STL he sent me into the printer instead of looking it over first.

Never a good idea. The problem was the peg in the middle was actually raised off the build platform. So when it finally got to printing that peg it was already printing in thin air, attached to nothing. So I went back and forth with the designer a few times while I coached him on how to fix the object to make it more printable. Things like lowering the peg so it touches the bottom and adding support for the LED hole on the face so it won't mess up the bridging on the top of the key. Eventually he asked the question that should have been asked at the start:
In other words if I printed the model upside down of how it's going to be used with the face of the key on the print platform wouldn't that solve the peg problem? The answer of course is, well, yes it would, but I had already done all this work on making it printable the other way around. So I printed it both ways.

The point of this is you can save yourself some headache if you remember that you don't need to print things out in the same orientation they're going to be used.
Monday, January 14, 2013
3D Printing Tidbit - Shells are important
Okay, lesson learned. There is a reason why shells is one of the options on print-o-matic. Shells are as important to successful prints as filament diameter.
 I was having a terrible time printing stacking bins without cracking. I moved the Replicator somewhere warmer, slowed the print down, sped it up, increased printing temp, lowered it, all to no effect. Finally I begged for help and Joseph Chiu shows up on chat to suggest that I increase the fill and number of shells and I'll be darned if that didn't do the trick. 25% fill and 3 shells provided enough adhesion to overcome the thermal contraction and prevent almost all cracking of the walls during the print. (There was a little bit of cracking on the back where the infill was on the other side so maybe a 4th shell is in order.)
In other cases I've found that at least 2 shells are necessary if you're printing small pieces like chess and game pieces, but you can decrease the fill rate to about 10% in that case and since they're pretty round and lack large flat sides they adhere pretty good. On the other hand if you have fine details on the top layers multiple shells will prevent them from printing well, so you may want to do 0 extra shells in that case (remember the one around the outside is a gimme) and rely on the fill layers instead of the extra shells so that things look good. But in that case you may want to print higher infill to strengthen the print.
So the rule is large prints with flat walls and sharp (around 90 degree) corners use more shells to make sure the corners don't separate and medium infill, about 20-30%. Very short prints with fine details on the top like coins or tokens you can use 0 shells so the details aren't marred but you probably want to increase infill to 25-100%. Small, mostly round prints like game pieces use 2 extra shells for stability but you can decrease infill to about 10-15%. Not everything fits well into all those buckets, so you will, naturally, have to rely on your judgement.

In other cases I've found that at least 2 shells are necessary if you're printing small pieces like chess and game pieces, but you can decrease the fill rate to about 10% in that case and since they're pretty round and lack large flat sides they adhere pretty good. On the other hand if you have fine details on the top layers multiple shells will prevent them from printing well, so you may want to do 0 extra shells in that case (remember the one around the outside is a gimme) and rely on the fill layers instead of the extra shells so that things look good. But in that case you may want to print higher infill to strengthen the print.
So the rule is large prints with flat walls and sharp (around 90 degree) corners use more shells to make sure the corners don't separate and medium infill, about 20-30%. Very short prints with fine details on the top like coins or tokens you can use 0 shells so the details aren't marred but you probably want to increase infill to 25-100%. Small, mostly round prints like game pieces use 2 extra shells for stability but you can decrease infill to about 10-15%. Not everything fits well into all those buckets, so you will, naturally, have to rely on your judgement.
Monday, January 7, 2013
Don't fear the update tutorial video
There are some people who are afraid to update their makerbot firmware. It's really not that bad. Sorry about the crappy and dark video, but I just wanted to show what it was like.
The take away's from this are:
- Don't leave your bot plugged into the USB when its turned off, it can ruin the board.
- When the update says "Try to press the reset button just before you press 'Update'" ignore that. If you're using Windows you may want to go the other way.
- If at first you don't succeed, don't take it personal. Try, try again.
- The rapidly blinking light I mention is on the motherboard but can be seen through the hole for the power switch.
And in other news, My x-axis is fine now. Thanks Greg. (And Dan.)
Monday, December 17, 2012
3D Printing Tidbit - Spooling loose filament
Believe me when I say that hours of trial and error have gone into discovering this trick. Sometimes you get loose filament, filament that is not on a spool. And whether you use an empty spool or print one getting the filament on the spool in always a challenge. The filament either gets twisted and wants to knot up or gets loose and wants to fall all over. I've tried it alone, I've recruted help, I've slipped it over a broom handle, nothing. Whatever I do it's a mess and takes way to long to successfully spool until I figured this out:

Subscribe to:
Posts (Atom)